
GSTN - RSAT: Difference between revisions
No edit summary |
No edit summary |
||
| Line 125: | Line 125: | ||
{{anchor|RefHeading4801318551107}} To create a new user open ''Active Directory Users and Computers'' snap-in by typing ''administrative tools'' in search box as shown in below print screen. | {{anchor|RefHeading4801318551107}} To create a new user open ''Active Directory Users and Computers'' snap-in by typing ''administrative tools'' in search box as shown in below print screen. | ||
Latest revision as of 09:04, 2 February 2019
RSAT (Remote Server Administration Tool)
Date : 09.09.2016
Document Version : 1.0
Table of Contents:1. RSAT Tool Usage and configuration3
1.4 Enabling the "Advanced Features" view4
Template:Anchor 1. RSAT Tool Usage and configuration[edit]
Template:Anchor 1.1 Introduction[edit]
The easiest way to administer an Active Directory is by using Microsofts RSAT (Remote Server Administration Tools) on a Windows machine.
Another big advantage of using RSAT, it increases the available documentation (books, online, etc.), because it's the common way Windows administrators are doing these tasks.
Template:Anchor 1.2 Download[edit]
Template:Anchor 1.3 Installation[edit]
- Install RSAT using the downloaded installer
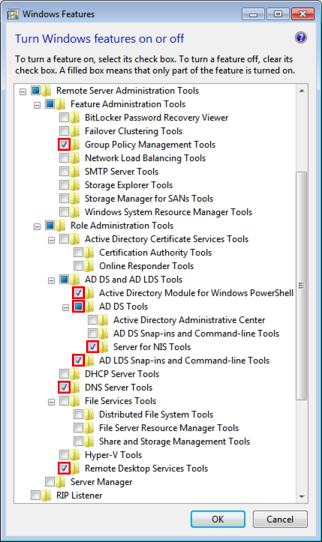

- Open "Programs and Features" (use the "Start Menu/Metro search to locate the tool).
- Open "Turn Windows features on or off"
Depending on the administrative tasks you want to perform, you choose the features to install. The following are recommended options to be installed for Samba Active Directory installations:
Template:Anchor 1.4 Enabling the "Advanced Features" view[edit]
Most of the RSAT tools hide content and menu options in their default setting. To enable all features and display the whole content in each program, go to the "View" menu and activate "Advanced Features".

Template:Anchor 2. Creating a new user.[edit]
Template:Anchor To create a new user open Active Directory Users and Computers snap-in by typing administrative tools in search box as shown in below print screen.

Double click on Active Directory Users and Computers snap-in.

Once we’re inside the Active Directory Users and Computers snap-in, we’ll need to expand the domain in which we want to create the user, and right-click on the Users folder. We’ll then select New>User.

The New Object – User box will pop up and require you to put in the user’s name and create the user logon.

Next we’ll give the user an initial password, and make sure to have them change it as soon as they first logon.

When we’re finished, we’ll get a summary of new created user. Click on finish button.

We can see our newly created user in Users folder in the domain.

Template:Anchor 3. DNS Records[edit]
Template:Anchor DNS records are the entries of the computer names along with their corresponding IP addresses in the DNS server database. Although there can be several DNS record types that a DNS server database can have, some of the most commonly used and important DNS records include.*
- Host (AAAA) – Host (AAAA) records are the names of the computers along with their corresponding IPv6 IP addresses that are registered with the DNS server.
- MX – MX are the Mail Exchanger records that are added to the DNS server.
- CNAME – CNAME a.k.a. Canonical Name is an alias name that administrators create in the DNS server to specify a more user-friendly name of any computer that has a complex name.
Template:Anchor 3.1 Adding DNS Records Manually[edit]
Although DNS records will be created autometically once system join in domain but in some situation we need FQDN without joining machine in domain, To handle this situation we can add DNS records manually by following below steps:
1. Opne DNS snap-in from Administrative tools. Add DNS servers by clicking on Action>Connect to DNS Server as shown below.

2. Select “The following computer:” and type the DNS server name or IP and click on OK.

3. On DNS Manager snap-in, from the console tree in the left pane, expand the DNS server name.
From the expanded list, click Forward Lookup Zones. from the displayed zones list, click to select the DNS zone for which Host (A) DNS record is to be added. Once selected, right-click the DNS zone.
From the displayed context menu, click New Host (A or AAAA).

4. On New Host box, type the Name along with the IP address of the target host computer in the Name and IP address fields respectively. Once done, click Add Host.
