
Application Cluster on SLES for Tobacco Board project - NIIT
Application Cluster on SLES for Tobacco Board project[edit]
(with CRM File )
Table of Contents[edit]
Acknowledgment[edit]
Special thanks to Sanjeet,Novell who worked immensely hard to make this project possible. Also special thanks to the application team and site engineers for their patience during the time I kept them awake till early morning
Introduction[edit]
The client wanted a high-availability setup for their application. To ensure this, two servers were setup, running Pacemaker with DRBD on SuSE Linux Enterprise server Service Pack-2.
Pacemaker is responsible for managing the cluster and the services.
OpenAIS ensures messaging between the two nodes.
Pacemaker+OpenAIS form the cluster stack.
DRBD is replicating the disks on both the servers.
Prerequisites[edit]
1) SLES 11 SP 2 install DVD and high availability extension
2) Setup ssh logins via auth-keys
3) Basic knowledge of handling SLES or similar distributions
Servers[edit]
Two servers have been set up as follows:
node1.apf05.tb - 10.0.5.7
node2.apf05.tb - 10.0.5.8
Cluster-IP - 10.0.5.9
The two servers are sharing storage via DRBD, which syncs the HDD partition.
They are being fenced using simple ping via Pacemaker.
Architecture Diagram[edit]

Messaging and Infrastructure Layer
The primary or first layer is the messaging/infrastructure layer, also known as the Corosync/OpenAIS layer. This layer contains components that send out the messages containing “I'm alive” signals, as well as other information. The program of the High Availability Extension resides in the messaging/infrastructure layer.
Resource Allocation Layer
The next layer is the resource allocation layer. This layer is the most complex, and consists of the following components:
1:-Cluster Resource Manager (CRM)
Every action taken in the resource allocation layer passes through the Cluster Resource Manager. If other components of the resource allocation layer (or components which are in a higher layer) need to communicate, they do so through the local CRM. On every node, the CRM maintains the [../../home/biswajit/documentation/Tetra/documents%20from%20engineer/Shashank_Singh/Tobaco_Board%20/Desktop/Shashank/pd/shashank/suse_cluster_guide/book_sleha.html#vle.cib Cluster Information Base (CIB)].
2:-Cluster Information Base (CIB)
The Cluster Information Base is an in-memory XML representation of the entire cluster configuration and current status. It contains definitions of all cluster options, nodes, resources, constraints and the relationship to each other. The CIB also synchronizes updates to all cluster nodes. There is one master CIB in the cluster, maintained by the [../../home/biswajit/documentation/Tetra/documents%20from%20engineer/Shashank_Singh/Tobaco_Board%20/Desktop/Shashank/pd/shashank/suse_cluster_guide/book_sleha.html#vle.dc Designated Coordinator (DC)]. All other nodes contain a CIB replica.
3: Designated Coordinator (DC)
One CRM in the cluster is elected as DC. The DC is the only entity in the cluster that can decide that a cluster-wide change needs to be performed, such as fencing a node or moving resources around. The DC is also the node where the master copy of the CIB is kept. All other nodes get their configuration and resource allocation information from the current DC. The DC is elected from all nodes in the cluster after a membership change.
4:- Policy Engine (PE)
Whenever the Designated Coordinator needs to make a cluster-wide change (react to a new CIB), the Policy Engine calculates the next state of the cluster based on the current state and configuration. The PE also produces a transition graph containing a list of (resource) actions and dependencies to achieve the next cluster state. The PE always runs on the DC.
5:-Local Resource Manager (LRM)
The LRM calls the local Resource Agents on behalf of the CRM. It can thus perform start / stop / monitor operations and report the result to the CRM. It also hides the difference between the supported script standards for Resource Agents (OCF, LSB, Heartbeat Version 1). The LRM is the authoritative source for all resource-related information on its local node.
Resource Layer
The highest layer is the Resource Layer. The Resource Layer includes one or more Resource Agents (RA). Resource Agents are programs (usually shell scripts) that have been written to start, stop, and monitor a certain kind of service (a resource). Resource Agents are called only by the LRM. Third parties can include their own agents in a defined location in the file system and thus provide out-of-the-box cluster integration for their own software.
Process Flow[edit]
SUSE Linux Enterprise High Availability Extension uses Pacemaker as CRM. The CRM is implemented as daemon (crmd) that has an instance on each cluster node. Pacemaker centralizes all cluster decision-making by electing one of the crmd instances to act as a master. Should the elected crmd process (or the node it is on) fail, a new one is established.
A CIB, reflecting the cluster’s configuration and current state of all resources in the cluster is kept on each node. The contents of the CIB are automatically kept in sync across the entire cluster.
Many actions performed in the cluster will cause a cluster-wide change. These actions can include things like adding or removing a cluster resource or changing resource constraints. It is important to understand what happens in the cluster when you perform such an action.
For example, suppose you want to add a cluster IP address resource. To do this, you can use one of the command line tools or the GUI to modify the CIB. It is not required to perform the actions on the DC, you can use either tool on any node in the cluster and they will be relayed to the DC. The DC will then replicate the CIB change to all cluster nodes.
Based on the information in the CIB, the PE then computes the ideal state of the cluster and how it should be achieved and feeds a list of instructions to the DC. The DC sends commands via the messaging/infrastructure layer which are received by the crmd peers on other nodes. Each crmd uses its LRM (implemented as lrmd) to perform resource modifications. The lrmd is not cluster-aware and interacts directly with resource agents (scripts).
All peer nodes report the results of their operations back to the DC. Once the DC concludes that all necessary operations are successfully performed in the cluster, the cluster will go back to the idle state and wait for further events. If any operation was not carried out as planned, the PE is invoked again with the new information recorded in the CIB.
In some cases, it may be necessary to power off nodes in order to protect shared data or complete resource recovery. For this Pacemaker comes with a fencing subsystem, stonithd. STONITH is an acronym for “Shoot The Other Node In The Head” and is usually implemented with a remote power switch. In Pacemaker, STONITH devices are modeled as resources (and configured in the CIB) to enable them to be easily monitored for failure. However, stonithd takes care of understanding the STONITH topology such that its clients simply request a node be fenced and it does the rest.
Cluster Diagram

Details of Components[edit]
Ping-gateway
A node on a network that serves as an entrance to another network. In this architecture, the gateway is the firewall that routes the traffic from a server to the outside network that is serving the Web pages of tobacco board. Gateway is used as a fencing device for this architecture.
Heartbeat[edit]
Heartbeat is a daemon that provides cluster infrastructure (communication and membership) services to its clients. This allows clients to know about the presence (or disappearance!) of peer processes on other machines and to easily exchange messages with them.
In order to be useful to users, the Heartbeat daemon needs to be combined with a cluster resource manager (CRM) which has the task of starting and stopping the services (IP addresses, web servers, etc.) that cluster will make highly available. Pacemaker is the preferred cluster resource manager for clusters based on Heartbeat.
Pacemaker
Pacemaker is graphical tool to manage cluster-infrastructure. From the pacemaker gui interfaces we can manage cluster-infrastructure eaisly, stop any resource, start the resource
or cleanup the resource all preform from the pacemaker.
DRBD[edit]
DRBD refers to block devices designed as a building block to form high availability (HA) clusters. This is done by mirroring a whole block device via an assigned network.DRBD can be understood as network based raid-1.
In the illustration below, the two orange boxes represent two servers that form an HA cluster. The boxes contain the usual components of a Linux™ kernel: file system, buffer cache, disk scheduler, disk drivers, TCP/IP stack and network interface card (NIC) driver. The black arrows illustrate the flow of data between these components
Tomcat
Tomcat is an application server that provides software applications with services such as security, data services, transaction support, load balancing, and management of large distributed systems. In this architecture tomcat used as web server to run the synergy application.
HHTSERVER
HHT tends to Hand Held terminal in this infrastructure HHT is used as an application through
which eauction is going in process.
Mysql
Mysql is used in this infrastructure for the data storage purpose. All users and data information stored in the mysql database.
Nodes
Nodes are the server machine which is communicate with each other and replicate information and data on both nodes.
Installation of SLES 11 SP 2[edit]
- Configure RAID-1 in the BIOS of the IBM servers
- For RAID to be active, drivers from IBM need to be installed during the loading of the SLES DVD itself. For that, follow these steps:
- Go to http://www-947.ibm.com/support/entry/portal/docdisplay?lndocid=migr-5088769
- Download the zip file and extract it
- Burn 'megasr-15.00.0329.2012-1_sles11sp2_64_disk1.img' onto a USB using the following command:dd if='megasr-15.00.0329.2012-1_sles11sp2_64_disk1.img' of=/dev/sdb1
- Boot to the SLES 11 DVD
- When the text "ELILO... " appears on the screen counting dots, type the following install parameters interrupting the automatic install. The screen should appear as follows:
For ServeRAID C100
ELILO....
linux driverupdate=1 brokenmodules=ahci
- The install will detect the software RAID module and prompt with a "Driver Updates added" notification indicating the "LSI MegaRAID Software RAID Module" was installed.
- Select "Okay" and either install any additional drivers when prompted or choose "Back" to continue the installation.
- The graphic portion of the installation will begin. Continue the installation following the screens through to completion.
Installing SUSE Linux Enterprise Server[edit]
Use these instructions if there is no existing Linux system on your machine, or if you want to replace an existing Linux system.
Insert the SUSE Linux Enterprise Server DVD into the drive, then reboot the computer to start the installation program.

|
Select Installation on the boot screen, then press Enter. This loads the SUSE Linux Enterprise Server installation program and starts the installation in normal mode.

|
Select the language to be used during the installation and for the installed system.
Read the License Agreement and click Yes, I Agree to the License Agreement. Proceed with Next.

|
Decide if you want to accomplish a New Installation or an update from a previous version of SUSE Linux Enterprise Server. Proceed with Next.

|
Select the clock and time zone to use in your system. Proceed with Next.

|
Decide if you want to install as primary operating system on a Physical Machine, as a virtual guest inside a XEN machine by selecting Virtual Machine, or as a virtualization host that can run other virtual machines with the option XEN Virtualization Host. Proceed with Next.

|
Use the Installation Settings screen to view a number of proposed installation and partitioning options, then change your desired options if necessary.
The Overview tab contains basic options that sometimes need manual intervention (in most common installation situations). The Expert tab contains advanced configuration options.
Installation is continued as expected. Do the partitioning as follows:
| /dev/sda1 | /boot/efi | 153MB
|
| /dev/sda2 | swap | 2GB
|
| /dev/sda3 | / | 63GB
|
| /dev/sda4 | /opt | 400GB
|
Ensure /opt is not mounted. Cluster will take care of mounting.
Click Accept to accept any license agreements.

|
Start the installation with Install.
After completing the basic system setup and the installation of all selected software packages, the SUSE Linux Enterprise Server installation boots into the new Linux system. After the reboot you will see the following screen:

|
Type a password for the system administrator account (called the root user).
You should never forget the root password! After you entered it here, the password cannot be retrieved. It can only be reset with administrative assistance. Proceed with Next.

|
Enter a name for this computer and the DNS domain to which it belongs. Proceed with Next.

|
In the Network Configuration screen, view or change the network connections of your system.
If you have network devices (for example, network or wireless cards, a DSL connection, ISDN adapter, or modem), it is a good idea to configure them now, because an Internet connection allows SUSE Linux Enterprise Server to retrieve any available updates and include them in the installation. Proceed with Next.

|
Test your Internet connection with Yes, Test Connection to the Internet. This option also checks for the latest SUSE Linux Enterprise Server release notes. Proceed with Next.
View the results of the test on the Running Internet Connection Test screen. Proceed with Next.

|
Enable on the Novell Customer Center Configuration screen your system for online updates with Configure Now > Next > Continue.
Click Configure Later > Next to skip this step and continue the installation. You can configure this option after the product has been installed. Proceed with Next.

|
By default, SUSE Linux Enterprise Server creates a certificate for the system. To disable this, click Skip Configuration > Next. Proceed with Next.

|
Select Local (/etc/passwd) in the User Authentication Method screen, unless instructed otherwise by your system administrator. Proceed with Next.

|
Type your first and last name in the User’s Full Name field, your login name in the Username field, and your password (as recommended by your system administrator) in the Password field.
For security reasons, your password should be at least eight characters long and should contain both uppercase and lowercase letters and numbers. The maximum length for passwords is 72 characters, and passwords are case sensitive. Proceed with Next.

|
View the Release Notes after the system configuration has completed. Proceed with Next.
Use the Hardware Configuration screen to view or configure your graphics card and other hardware devices. Proceed with Next.
On the Installation Completed screen, click Finish to close the SUSE Linux Enterprise Server installation and continue to the login screen.
Enter your username, and type your password in the Password field, then press Enter.
Installation of the cluster[edit]
Active node: node1.apf05.tb
Standby node: node2.apf05.tb
Cluster service hostname: apf05.eauction.com
Mounted HDD: /dev/sda4
Package Installation and initialization:[edit]
First we setup local software repositories.
- Copy the installation DVD to /mnt/OSCD
open the Disk and browse it further copy the OSCD folder at given location. - Copy the High-Availability DVD to /mnt/CLUSTERCD
- Use the following repo files. Place them in /etc/zypp/repos.d/
create a file with name cluster.repo with following command
vim /etc/zypp/repos.d/cluster.repo
now copy the following in above file
[ClusterRepo]
name=Cluster-Repo
enabled=1
autorefresh=0
baseurl=file:///mnt/CLUSTERCD
path=/
type=yast2
keeppackages=0
Now create a file with name local.repo
vim /etc/zypp/repos.d/local.repo
and copy below data in above file.
[SUSE-Linux-Enterprise-Server-11-SP2 11.2.2-1.234]
name=SUSE-Linux-Enterprise-Server-11-SP2 11.2.2-1.234
enabled=1
autorefresh=0
baseurl=file:///mnt/OSCD
path=/
type=yast2
keeppackages=0
We need the cluster, DRBD, yast2-cluster, pacemaker, tomcat and mysql packages. We can do this via Yast2, which is the control center for SuSE.

- To install via Yast2:
- Click on 'Computer' on the bottom left of the desktop, and then on 'Yast'
- Choose 'Software Management'
- Go to RPM groups > Productivity > Clustering. On the right, choose any package, right-click, go to 'All-in-list' and then 'Install'
- Search for 'yast2-cluster', 'pacemaker', 'tomcat' and 'mysql'. Install all these packages.
- Connect both nodes via ssh after doing this there is no need of password for connecting both server via ssh.ssh-keygenssh-copy-id -i ~/.ssh/id_rsa.pub node1
ssh node1 - Do this procedure on the other node.
- ssh-keygenssh-copy-id -i ~/.ssh/id_rsa.pub node2
ssh node2
- Ensure that hosts file on both servers are identical, and have each other's entries. Open the file with vim or any graphical editer the file is /etc/hosts and the entries will be shown like below. IP will be different on different location
10.0.4.7 node1.apf4.tb node1
10.0.4.8 node1.apf4.tb node2
NOTE: Ensure that users tomcat and mysql have the same UID and GID in /etc/passwd and /etc/group on the both node because if there is any other user or group have same UID or GID like mysql or tomcat then the cluster wouldn't be allow to transfer the services on other node.
Configuring Firewall[edit]
We can configure the firewall via Yast2, by going to 'Security and Users' > 'Firewall' as shown:


This brings up the first screen. Here we can start and stop the firewall, and enable it on startup. For now, we will enable it on startup.
Ensure that the interfaces are in the 'Internal Zone', else the firewall will block all ports.

Then click 'Next' for the other options, and finally save settings and restart firewall
High-Availability Initialization:[edit]
1) Run 'sleha-init' on node1:
chkconfig ntp on
sleha-init
Output:
ntp on
WARNING: Could not detect IP address for eth0
WARNING: Could not detect network address for eth0
Enabling sshd service
/root/.ssh/id_rsa already exists - overwrite? [y/N] n
Configuring csync2
csync2 is already configured - overwrite? [y/N] y
Generating csync2 shared key (this may take a while)...done
Enabling csync2 service
Enabling xinetd service
csync2 checking files
Configure Corosync:
This will configure the cluster messaging layer. You will need
to specify a network address over which to communicate (default
is eth0's network, but you can use the network address of any
active interface), a multicast address and multicast port.
/etc/corosync/corosync.conf already exists - overwrite? [y/N] y
Network address to bind to (e.g.: 192.168.1.0) [] 10.0.5.0
Multicast address (e.g.: 239.x.x.x) [239.44.6.153]
(Default value - Press enter)
Multicast port [5405]
(Default value - Press enter)
Configure SBD:
If you have shared storage, for example a SAN or iSCSI target,
you can use it avoid split-brain scenarios by configuring SBD.
This requires a 1 MB partition, accessible to all nodes in the
cluster. The device path must be persistent and consistent
across all nodes in the cluster, so /dev/disk/by-id/* devices
are a good choice. Note that all data on the partition you
specify here will be destroyed.
Do you wish to use SBD? [y/N] n
WARNING: Not configuring SBD - STONITH will be disabled.
Enabling hawk service
HA Web Konsole is now running, to see cluster status go to:
Log in with username 'hacluster', password 'linux'
WARNING: You should change the hacluster password to something more secure!
Enabling openais service
Waiting for cluster.......done
Loading initial configuration
Done (log saved to /var/log/sleha-bootstrap.log)
3) run 'sleha-join' on node2
Output:
ntp on
WARNING: Could not detect IP address for eth0
WARNING: Could not detect network address for eth0
Join This Node to Cluster:
You will be asked for the IP address of an existing node, from which
configuration will be copied. If you have not already configured
passwordless ssh between nodes, you will be prompted for the root
password of the existing node.
IP address or hostname of existing node (e.g.: 192.168.1.1) [] 10.0.5.7
Enabling sshd service
/root/.ssh/id_rsa already exists - overwrite? [y/N] n
Configuring csync2
Enabling csync2 service
Enabling xinetd service
Probing for new partitions......done
Enabling hawk service
HA Web Konsole is now running, to see cluster status go to:
Log in with username 'hacluster', password 'linux'
WARNING: You should change the hacluster password to something more secure!
Enabling openais service
Waiting for cluster....done
Done (log saved to /var/log/sleha-bootstrap.log)
4) Copy following crmconfig in 'crm configure edit' on node1. Ignore warnings and errors for now. It will automatically sync to node2. Through this file we can manage all the resource and constarints of the cluster. Basically in this Infrastructure we use boot strap to configure all resouce automatically with the help of this file. Information of all nodes, resouce, constraints and there parameters are configured by this file. This file also manage which resource run first and which resource run after it's parents.
node node1 \
attributes standby="off"
node node2 \
attributes standby="off"
primitive drbd_mysql ocf:linbit:drbd \
params drbd_resource="r0" \
operations $id="drbd_mysql-operations" \
op monitor interval="15s" \
meta resource-stickiness="infinity"
primitive fs_mysql ocf:heartbeat:Filesystem \
params device="/dev/drbd0" directory="/opt" fstype="ext3" \
meta resource-stickiness="infinity"
primitive hhtserver lsb:hht \
meta resource-stickiness="infinity" target-role="Started"
primitive ip_mysql ocf:heartbeat:IPaddr2 \
operations $id="ip_mysql-operations" \
params ip="10.0.5.9" cidr_netmask="255.255.255.0" \
meta resource-stickiness="infinity"
primitive mysqld lsb:mysql \
meta resource-stickiness="infinity" \
operations $id="mysqld-operations" \
op monitor interval="15" timeout="15"
primitive ping-gateway ocf:pacemaker:ping \
operations $id="ping-gateway-operations" \
op monitor interval="10" timeout="60" \
params host_list="10.0.5.1" attempts="2" \
meta is-managed="true"
primitive tmcat lsb:tomcat6 \
operations $id="tmcat-operations" \
op monitor interval="15" timeout="15" \
meta is-managed="true" resource-stickiness="infinity"
group mysql fs_mysql ip_mysql mysqld tmcat hhtserver \
meta target-role="Started"
ms ms_drbd_mysql drbd_mysql \
meta master-max="1" master-node-max="1" clone-max="2" clone-node-max="1" notify="true" target-role="Started"
clone ping-gateway-clone ping-gateway \
meta target-role="Started" interleave="true"
location ms-drbd-on-connected ms_drbd_mysql \
rule $id="ms-drbd-on-connected-rule" $role="master" -inf: not_defined pingd or pingd lte 0
colocation mysqld_on_drbd inf: mysql:Started ms_drbd_mysql:Master
order mysql_after_drbd inf: ms_drbd_mysql:promote mysql:start symmetrical=true
order ping-gateway-before-ms-drbd 1000: ping-gateway-clone:start ms_drbd_mysql:promote symmetrical=true
property $id="cib-bootstrap-options" \
stonith-enabled="false" \
no-quorum-policy="ignore" \
dc-version="1.1.6-b988976485d15cb702c9307df55512d323831a5e" \
cluster-infrastructure="openais" \
expected-quorum-votes="2" \
default-resource-stickiness="1000000" \
last-lrm-refresh="1350537073"
rsc_defaults $id="rsc-options" \
resource-stickiness="INFINITY"
op_defaults $id="op-options" \
record-pending="false"
Check if configuration is same by on node2, and then stop corosync after this. Run the following on both servers, at the same time:
/etc/init.d/openais stop
Preparing DRBD:[edit]
- Change DRBD's configuration files:
- Open the file /etc/drbd.conf and insert the following lines on both the nodes:
include "drbd.d/global_common.conf";
include "drbd.d/*.res";
-
- Open the file /etc/drbd.d/global_common.conf on node1. It contains already some pre-defined values. Go to the startup section and insert these lines. [This is necessary only on node1. csync (coming up later on) will copy the files to node2]:
startup {
# wfc-timeout degr-wfc-timeout outdated-wfc-timeout
# wait-after-sb;
wfc-timeout 1;
degr-wfc-timeout 1;
}
These options are used to reduce the timeouts when booting, see http://www.drbd.org/users-guide-emb/re-drbdconf.html for more details.
-
- Create the file /etc/drbd.d/r0.res, change the lines according to your server, and save it (only on node1). Lines to change have been highlighted:
resource r0 {
protocolC;
disk {
on-io-errorpass_on;
fencing resource-only;
}
handlers {
split-brain "/usr/lib/drbd/notify.sh root";
fence-peer "/usr/lib/drbd/crm-fence-peer.sh";
after-resync-target "/usr/lib/drbd/crm-unfence-peer.sh";
}
net {
after-sb-0pri discard-least-changes;
after-sb-1pri discard-secondary;
after-sb-2pri call-pri-lost-after-sb;
data-integrity-alg sha1;
use-rle;
verify-alg sha1;
csums-alg sha1;
}
syncer {
rate 30M;
al-extents 257;
}
startup {
wfc-timeout20;
degr-wfc-timeout30;
}
on node2 {
disk/dev/sda4;
address10.0.5.8:7788;
device/dev/drbd0 ;
meta-diskinternal;
}
on node1 {
disk/dev/sda4;
address10.0.5.7:7788;
device/dev/drbd0 ;
meta-diskinternal;
}
}
- Check the syntax of your configuration file(s). If the following command returns an error, verify your files:
drbdadm dump all
- If you have configured Csync2 (which should be the default), the DRBD configuration files are already included in the list of files which need to be synchronized. To synchronize them, ie, copy the files on node2, use this on node1:
csync2 -xv
If you do not have Csync2 (or do not want to use it), copy the DRBD configuration files manually to the other node:
rsync -Pa /etc/drbd.conf node2:/etc/
rsync -Pa /etc/drbd.d/* node2:/etc/drbd.d/
- Destroy the file system structure with the following command and repeat this step: dd if=/dev/zero of=/dev/sda4 count=10000Initialize the meta data on both systems by entering the following on each node:
drbdadm -- --ignore-sanity-checks create-md r0
rcdrbd start
- Watch the DRBD status by entering the following on each node:
rcdrbd status
You should get something like this:
drbd driver loaded OK; device status:
version: 8.3.7 (api:88/proto:86-91)
GIT-hash: ea9e28dbff98e331a62bcbcc63a6135808fe2917 build by phil@fat-tyre, 2010-01-13 17:17:27
m:res cs ro ds p mounted fstype
0:r0 Connected Secondary/Secondary Inconsistent/Inconsistent C
- Start the rsync process on node1. This will take around 2 hours it will sync the cluster on both node and make node1 to primary node and node2 to secondary node:
drbdadm -- --overwrite-data-of-peer primary r0
To check speed and remaining time, use this command:
cat /proc/drbd
- Check the status again with rcdrbd status and you get:
...
m:res cs ro ds p mounted fstype
0:r0 Connected Primary/Secondary UpToDate/UpToDate C
The status in the ds row (disk status) must be UpToDate on both nodes.
- Set node1 as primary node:
drbdadm primary r0
- Do this on node1. Create ext3 on top of your DRBD device . CLOSE ALL LIKE FIREFOX BECAUSE THIS PROCESS TAKES A LOT OF MEMORY.:
mkfs.ext3 /dev/drbd0
Mount the file system at node1 through this command:
mount /dev/drbd0 /opt/
Preparing Mirrored disk for running the application:[edit]
We need to create the directory structure and soft links pointing to the mirrored disk for running tomcat and mysql. Do this on Primary/Active node.
Directory structure on /opt/:
mount /dev/drbd0 /opt
mkdir /opt/mysql
mkdir /opt/tomcat
mkdir -p /opt/tomcat/TBoardReports/TB/reports
mkdir -p /opt/tomcat/logs/Synergy
mkdir /opt/tomcat/webapps
mkdir -p /opt/data/HHTServer/log
chgrp -R tomcat /opt/tomcat
chmod -R g+w /opt/tomcat
Creating soft links for tomcat and mysql (Do this on both nodes):
unlink /usr/share/tomcat6/logs
unlink /usr/share/tomcat6/webapps
ln -s /opt/tomcat/logs /usr/share/tomcat6/logs
ln -s /opt/tomcat/webapps /usr/share/tomcat6/webapps
mv /var/lib/mysql /var/lib/mysql.bk
ln -s /opt/mysql /var/lib/mysql
Syncing with mounted folder:
rsync -Pa /srv/tomcat6/webapps/ /opt/tomcat/webapps/
chown mysql.mysql -R /opt/mysql/
rsync -Pa /var/lib/mysql.bk/ /opt/mysql/
Check if the cluster is stopped, and then perform the following steps first on node1, then on node2, to check if mysql and tomcat are working as expected:
umount /opt
drbdadm secondary r0
drbdadm primary r0
mount /dev/drbd0 /opt
/etc/init.d/mysql start
/etc/init.d/tomcat6 start
To test mysql:
mysql
mysql> show databases;
To test tomcat:
Go to a browser and type 'http://10.0.5.7:8080'
NOTE: Before testing on node2, stop mysql and tomcat services, then run the following on node1:umount /opt
drbdadm secondary r0
Steps to run HHT application:[edit]
1) Create /usr/bin/hht (On both nodes)
#!/bin/bash
export PATH=$PATH:/opt/data/HHTServer/HHTServer.jar:/opt/data/HHTServer/mysql-connector-java-5.1.10-bin.jar:/opt/data/HHTServer
export CLASSPATH=$CLASSPATH:/opt/data/HHTServer/HHTServer.jar:/opt/data/HHTServer/mysql-connector-java-5.1.10-bin.jar:/opt/data/HHTServer
java com.cranessoftware.eas.server.startup.EASServerMain &> /tmp/hhtlog
2) Create /etc/init.d/hht (On both nodes)
#!/bin/sh
FOO_BIN=/usr/bin/hht
test -x $FOO_BIN || { echo "$FOO_BIN not installed";
if [ "$1" = "stop" ]; then exit 0;
else exit 5; fi; }
# Check for existence of needed config file and read it
FOO_CONFIG=/etc/hht.cfg
test -r $FOO_CONFIG || { echo "$FOO_CONFIG not existing";
if [ "$1" = "stop" ]; then exit 0;
else exit 6; fi; }
# Read config
. $FOO_CONFIG
# Shell functions sourced from /etc/rc.status:
. /etc/rc.status
# Reset status of this service
rc_reset
# Return values acc. to LSB for all commands but status:
# 0 - success
# 1 - generic or unspecified error
# 2 - invalid or excess argument(s)
# 3 - unimplemented feature (e.g. "reload")
# 4 - user had insufficient privileges
# 5 - program is not installed
# 6 - program is not configured
# 7 - program is not running
# 8--199 - reserved (8--99 LSB, 100--149 distrib, 150--199 appl)
#
# Note that starting an already running service, stopping
# or restarting a not-running service as well as the restart
# with force-reload (in case signaling is not supported) are
# considered a success.
case "$1" in
start)
echo -n "Starting FOO "
## Start daemon with startproc(8). If this fails
## the return value is set appropriately by startproc.
/sbin/startproc $FOO_BIN
# Remember status and be verbose
rc_status -v
;;
stop)
echo -n "Shutting down FOO "
## Stop daemon with killproc(8) and if this fails
## killproc sets the return value according to LSB.
/sbin/killproc -TERM $FOO_BIN
#/bin/kill -9 `ps -elf | grep cranessoftware | grep -v grep | awk '{print $4}'`
# Remember status and be verbose
rc_status -v
;;
try-restart|condrestart)
## Do a restart only if the service was active before.
## Note: try-restart is now part of LSB (as of 1.9).
## RH has a similar command named condrestart.
if test "$1" = "condrestart"; then
echo "${attn} Use try-restart ${done}(LSB)${attn} rather than condrestart ${warn}(RH)${norm}"
fi
$0 status
if test $? = 0; then
$0 restart
else
rc_reset# Not running is not a failure.
fi
# Remember status and be quiet
rc_status
;;
restart)
## Stop the service and regardless of whether it was
## running or not, start it again.
$0 stop
$0 start
# Remember status and be quiet
rc_status
;;
force-reload)
## Signal the daemon to reload its config. Most daemons
## do this on signal 1 (SIGHUP).
## If it does not support it, restart the service if it
## is running.
echo -n "Reload service FOO "
## if it supports it:
/sbin/killproc -HUP $FOO_BIN
#touch /var/run/FOO.pid
rc_status -v
## Otherwise:
#$0 try-restart
#rc_status
;;
reload)
## Like force-reload, but if daemon does not support
## signaling, do nothing (!)
# If it supports signaling:
echo -n "Reload service FOO "
/sbin/killproc -HUP $FOO_BIN
#touch /var/run/FOO.pid
rc_status -v
## Otherwise if it does not support reload:
#rc_failed 3
#rc_status -v
;;
status)
echo -n "Checking for service FOO "
## Check status with checkproc(8), if process is running
## checkproc will return with exit status 0.
# Return value is slightly different for the status command:
# 0 - service up and running
# 1 - service dead, but /var/run/ pid file exists
# 2 - service dead, but /var/lock/ lock file exists
# 3 - service not running (unused)
# 4 - service status unknown :-(
# 5--199 reserved (5--99 LSB, 100--149 distro, 150--199 appl.)
# NOTE: checkproc returns LSB compliant status values.
/sbin/checkproc $FOO_BIN
# NOTE: rc_status knows that we called this init script with
# "status" option and adapts its messages accordingly.
rc_status -v
;;
probe)
## Optional: Probe for the necessity of a reload, print out the
## argument to this init script which is required for a reload.
## Note: probe is not (yet) part of LSB (as of 1.9)
test /etc/FOO/FOO.conf -nt /var/run/FOO.pid && echo reload
;;
*)
echo "Usage: $0 {start|stop|status|try-restart|restart|force-reload|reload|probe}"
exit 1
;;
esac
rc_exit
3) Copy the HHTServer.jar and mysql-connector-java-5.1.10-bin.jar to the /opt/data/HHServer folder. (Do this only on node1, after following the previous steps for mounting on node1):
rsync -Pa HHT/HHTServer.jar /opt/data/HHTServer/
rsync -Pa HHT/mysql-connector-java-5.1.10-bin.jar /opt/data/HHTServer/
4) Create a dummy config file (On both nodes):
touch /etc/hht.cfg
Ensure cluster isn't running, manually load DRBD first on node1 then on node2, and then check if HHT is working by running /usr/bin/HHT.
Testing the cluster[edit]
Reboot both servers simultaneously.
Open the Pacemaker GUI. This can be done via the Yast2 menu (As shown in the image, Step 1), or via command line by 'crm_gui'. Click on the connect icon on the top left (Step 2), and enter the user 'hacluster', and password as has been set (Step 3).

If everything is working perfectly, then the screen should look as below:

We can now set the named.conf, eauction.com.master, my.cnf, and tomcat6.cnf to automatically sync via csync2.

We do this by first going to the Yast2 menu, selecting 'Cluster' in 'Other' as shown:
- We then go to 'Configure Csync2' and choose 'Add' to add the sync files.

Application configuration[edit]
Mysql initialization[edit]
- At the mysql prompt, run the following to allow remote access:grant all privileges on *.* to root@'%' with grant option;
- Enter the following line in '/etc/my.cnf', under the [mysqld] block:lower_case_table_names=1
- To set mysql root password, run the following at linux command prompt:mysql_secure_installation
Deploying Synergy application[edit]
- Copy the TB.war file to the directory /opt/tomcat/webapps.
- Restart tomcat6 from the Pacemaker GUI.
- If redeploying, delete the previous TB directory, rewrite the jar file and restart tomcat6 from the Pacemaker GUI.
- Create the license directory on both nodes:mkdir /usr/share/license
- MAC Address is needed for the license. THIS SHOULD BE GIVEN IN ALL CAPS. This can be obtained the following way:ip a s dev eth1
Output:
eth1: <BROADCAST,MULTICAST,UP,LOWER_UP> mtu 1500 qdisc pfifo_fast state UP qlen 1000
link/ether 00:16:44:d1:07:f1 brd ff:ff:ff:ff:ff:ff
inet 10.0.5.7/24 brd 10.0.5.255 scope global eth1
inet6 fe80::216:44ff:fed1:7f1/64 scope link
valid_lft forever preferred_lft forever - Copy the generated files to bhe /usr/share/license folder
Deploying HHT application[edit]
- Copy the jar file to the directory '/opt/data/HHTServer/'
- Restart HHT from hht Pacemaker GUI.
Port redirection of 80 to 8080[edit]
- Open /etc/sysconfig/SuSEfirewall2, and change line number 697 to:
FW_REDIRECT="0/0,10.0.5.9,tcp,80,8080" - Configure firewall via Yast2 GUI.
- Enable at startup.
- Ensure that the active interface is in the 'Internal Zone'.
- Start firewall.
TB report location[edit]
- /opt/data/HHTServer/TBReports
Mounting for barcode printer[edit]
The application generates barcodes which are then read by a Windows Machine which then forwards requests to the bar-code printer. To do this, we just have to mount the Windows share via CIFS:
mount -t cifs //10.0.5.75/SynergyBarcodeUtility /mnt/windowshare -o user=acer,uid=109,gid=115,file_mode=0777,dir_mode=0777,password='welcome
- 10.0.5.75 is the IP of the Windows PC, and SynergyBarcodeUtility is the shared folder.
- uid and gid is of the tomcat user on the server.
- user and password is the username and password of the Windows machine. If no password is set, please set one as sharing would not work without it.
- Place in fstab to ensure it is mounted after reboot
- Switch off DHCP for ALL interfaces as a SuSE bug unmounts the shared drive on DHCP lookup
Domain resolving to cluster-IP[edit]
Application should be accessible by FQDN, 'app05.eauction.com'. To do this, we setup a DNS server on both the nodes, which is then accessed by the cluster IP.
- Install bind.zypper install bind
- Edit named.conf
options {
directory "/var/lib/named";
dump-file "/var/log/named_dump.db";
statistics-file "/var/log/named.stats";
# for security setting below
# query range (set if you use only in LAN)
allow-query { localhost; 10.0.5.0/24; };
# transfer range (set only for secondary DNS)
allow-transfer { localhost; 10.0.5.0/24;};
# recursion range (set if you use only in LAN)
allow-recursion { localhost; 10.0.5.0/24; };
};
# here is the section for internal informations
view "internal" {
match-clients {
localhost;
10.0.5.0/24;
};
zone "." IN {
type hint;
file "root.hint";
};
# define your domain info for internal
zone "eauction.com" IN {
type master;
file "eauction.com.master";
allow-update { none; };
};
# define your IP info for internal *note
zone "4.0.10.in-addr.arpa" IN {
type master;
file "0.168.192.db";
allow-update { none; };
};
zone "localhost" IN {
type master;
file "localhost.zone";
};
zone "0.0.127.in-addr.arpa" IN {
type master;
file "127.0.0.zone";
};
};
include "/etc/named.conf.include";
3. Edit '/var/lib/named/eauction.com.master '.$TTL 86400
; comment by Shashank : location should be /var/lib/named/eauction.com.master
@IN SOAapf5.eauction.com. service.tetrain.com. (
2009043001 ;Serial
3600 ;Refresh
1800 ;Retry
604800 ;Expire
86400 ;Minimum TTL
)
IN NS apf5.eauction.com.
IN A 10.0.5.9
apf5 IN A 10.0.5.9
Script for calling mysql procedure
- This is done by placing the following command in a script:mysql -u root -p'niit@123' --database='apf5' -e 'call tb_proc_daily_configuration;'
- The script is as follows:
#!/bin/bash
LOGDIR="/opt/mysql/log/tb_proc_daily_configuration.log"
SQLERROR="/tmp/sqlerror"
LOGTEMP="/tmp/logtemp"
echo "Calling procedure on `date`" &> $LOGTEMP
echo "" >> $LOGDIR
echo "-----------------------------------------" >> $LOGDIR
echo "" >> $LOGDIR
cat $LOGTEMP >> $LOGDIR
mysql -u root -p'niit@123' --database='apf5' -e 'call tb_proc_daily_configuration;' &> $SQLERROR
if [ $? == "0" ]; then
echo "Calling tb_proc_daily_configuration successfully done on `date` !" >> $LOGDIR
else
cat "$SQLERROR" >> $LOGDIR
echo "An error has occured while calling tb_proc_daily_configuration on `date`." >> $LOGDIR
exit 1
fi
- This script is placed on the mounted drive, in /opt/scripts/call_tb_proc_daily_configuration.sh
- To run this every day at 1 AM, we put the following entry in crontab:0 1 * * * /opt/scripts/call_tb_proc_daily_configuration.sh
- We can check the entry from command line, as root user, with this command:crontab -l
- Logs for this command are created in '/opt/mysql/log/tb_proc_daily_configuration.log'
- We now create a launcher to call this function graphically. We do this by first right-clicking on the empty Desktop, and choosing 'Create Launcher':
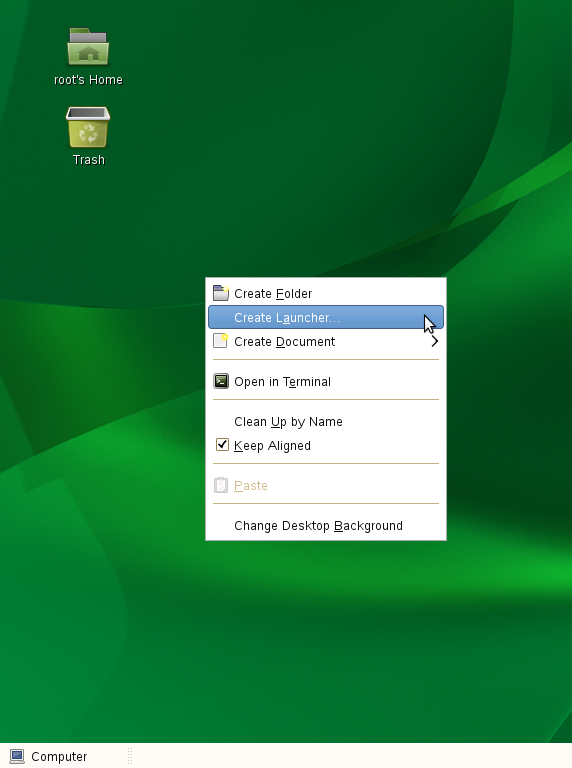
At the next screen, we type the following as shown. The most important is the 'Command'. Enter path of the script, ie, "/opt/scripts/call_tb_proc_daily_configuration.sh". Then click 'Close'.

Script for backup[edit]
- This script takes a backup of the mysql database, and places it in '/root/backup'.
- The script is as follows:
#!/bin/bash
LOGDIR="/opt/mysql/log/backup.log"
BKUPERROR="/tmp/bkuperror"
LOGTEMP="/tmp/logtemp1"
BKUPFILE="/root/backup/apf5.`date +%F`.sql"
echo "Starting backup on `date`" &> $LOGTEMP
echo "" >> $LOGDIR
echo "-----------------------------------------" >> $LOGDIR
echo "" >> $LOGDIR
cat $LOGTEMP >> $LOGDIR
mysqldump -u root -p'niit@123' apf5 > "$BKUPFILE" 2> $BKUPERROR
#mysql -u root -p'niit@123' --database='apf5' -e 'call tb_proc_daily_configuration;' &> $SQLERROR
#mysql -u root -p'niit@123' 'apf5; call tb_proc_daily_configuration;'
#[ $? == '0' && echo hello || echo nope ]
if [ $? == "0" ]; then
echo "Backup successfully done on `date`, stored as $BKUPFILE" >> $LOGDIR
else
cat "$BKUPERROR" >> $LOGDIR
echo "An error has occured while taking backup on `date`." >> $LOGDIR
exit 1
fi
- This script is placed on the mounted drive, in /opt/scripts/backup.sh
- To run this every day at 2.30 AM, we put the following entry in crontab:30 2 * * * /opt/scripts/backup.sh
- Logs are being stored at:/opt/mysql/log/backup.log
- Launcher is created in the same way as above, only the command argument will change to:/opt/scripts/backup.sh
Management of the cluster[edit]
Starting Pacemaker GUI[edit]
Please see the '[#11.6.Testing the cluster|outline Testing the cluster]' section above.
Starting / Stopping a service[edit]
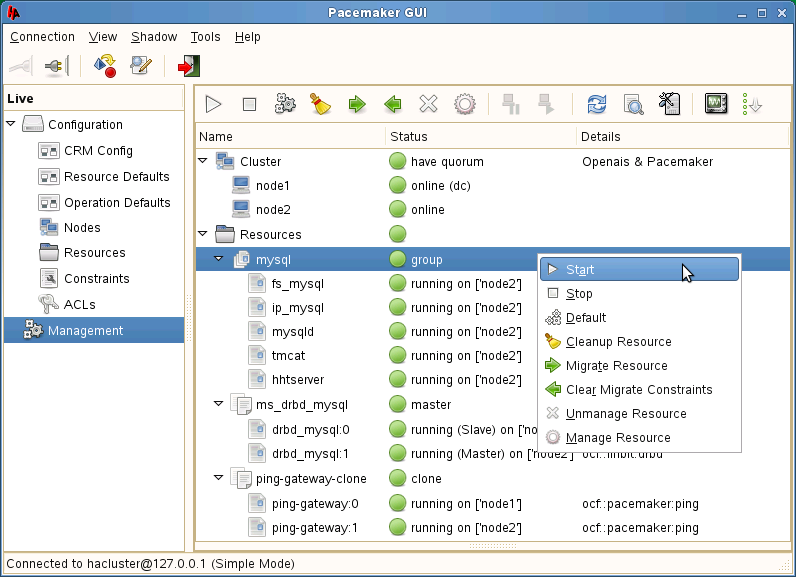
We can start stop the service by right-clicking on the service name, and then choosing 'Start' or 'Stop' as shown. Note that all the dependent services below it will be stopped as well.
For example, if we stop 'mysql', then 'tomcat' and 'hhtserver' will automatically stop first.

Starting stopping the entire group[edit]
We can similarly start/stop the entire group by right-clicking on the name, and choosing start/stop.
 [edit]

Cleaning resources[edit]
Sometimes if a resource becomes 'unmanaged', or doesn't start, (due to issues like power-failure), then we need to clean up the resources. This is done by right-clicking on the group, and choosing 'Cleanup Resource', as shown.

Refresh/Reprobe resouces[edit]
On changing the executables for resources, or adding new ones, it becomes necessary to reprobe, and then refresh them. This can be done as follows:

Troubleshooting[edit]
Installation issues[edit]
- Raid not being read - IBM drivers are needed for this. Please see the [#10.Installation of SLES 11 SP 2|outline installation section]
Network issues[edit]
- Ping both the servers and the gatewayping 10.0.5.1ping 10.0.5.7ping 10.0.5.8
- Check status of network card. It should show 'Link detected: OK'ethtool eth0Output:Link detected: no
DRBD[edit]
- Checking status:
rcdrbd status
Ideal status should be:
0:r0 Connected Primary/Secondary UpToDate/UpToDate
- If data is out of sync, to resolve this situation, enter the following on the node which has data to be discarded:
drbdadm secondary r0
drbdadm -- --discard-my-data connect r0
On the node which has the latest data enter the following: drbdadm connect r0
Pacemaker[edit]
- If the services come as 'unmanaged', then right-click on the MySQL resource, choose 'Clean-up resources', and restart the services via GUI.
- If services still do not work, check if the service is starting and stopping without error.
- If fencing is failing, ensure that the services are starting and stopping as expected.
- The follow commands are also useful:
- To see configuration:crm configure show
- To edit configuration:crm configure edit
- To monitor services: (More accurate than pacemaker GUI)crm_mon
- To start/stop cluster service:/etc/init.d/openais start/stop
Licensing issues[edit]
- Check the mac-address in the /usr/share/license/license*.log file.
- Ensure mac-address is entered in all-caps
Mysql issues[edit]
- If mysql cannot connect from outside, ensure root has access to all databaes:grant all privileges on *.* to root@'%' with grant option;
- Ensure that the database name is in small letters
Tomcat[edit]
- If tomcat is not starting, checking the following:
- Permissions of tomcat directories - the group should be tomcat, and group should have rwx permissionschgrp -R tomcat tomcatchmod -R g+w tomcat
- Softlinks are pointing to the right directory
- Sample webapp folder has been synchronizedrsync -Pa /srv/tomcat6/webapps/ /opt/tomcat/webapps/
- Check /var/log/catalina.out and /opt/tomcat/logs/catalina.out for further errors
HHT[edit]
- Check if the /usr/bin/hht has executable permissions
- If the service in the cluster is not starting, start manually and check the output for errors
- For log generation, define complete file path
How to restart HHT application[edit]
It will be done when the application sucks and there is no way to resolve the issue.
Step1:- First stop the HHT server from the Pacemaker Gui
Go to Computer > Yast > Other > Pacemaker Gui

Step2:- Check whether java application is running on the server or not it can be checked by system monitor or by console
For checking from system monitor Go through following steps
Computer >> aplicatons >> more >> system monitor >> processes
and check for java process
Step 3:- If java process running on the server then please stop it

Step 4:- Now start the HHT application again

Barcode printer[edit]
- Check if the Windowshare is mounted with the following command:
mount | grep cifs
- If there is no output, mount it again with the command in
[Mounting for barcode printer]